Is your espresso inconsistent? The culprit might be your grinder’s alignment. Learn how to perform the marker test and shim your burrs for perfect particle distribution.
Key Takeaways
- Alignment is Critical: Misaligned burrs create a mix of "boulders" and "fines," leading to uneven extraction and unpredictable espresso shots.
- The Marker Test: A simple dry-erase marker test can instantly reveal if your grinder burrs are sitting parallel to one another.
- The Fix is Cheap: You don’t need a new grinder; often, a few pieces of aluminum foil (shims) can achieve "hyper-alignment."
- Taste Improvement: Proper alignment results in higher clarity, sweeter shots, and a significantly wider sweet spot for dialing in.
You have bought high-quality beans, your water temperature is stable, and your puck prep is meticulous. Yet, your espresso still tastes muddy, sour, or astringent. You might be blaming your machine, but the real enemy is likely hiding inside your grinder.
Burr alignment is the silent killer of great coffee. When your grinder burrs aren’t perfectly parallel, they produce an inconsistent grind size. This lack of uniformity makes it mathematically impossible to achieve an even extraction.
The good news? You don’t need to be a machinist to fix it. With a simple marker and some aluminum foil, you can "shim" your grinder to achieve near-perfect particle distribution. Here is how to turn your good grinder into a great one.
Why Burr Alignment Matters for Flavor
To understand alignment, we have to look at what happens when beans are crushed. In a perfect world, two flat burrs sit perfectly parallel. As the coffee passes through, every particle is cut to the exact same size.
However, mass manufacturing is rarely perfect. If one burr is tilted even by a fraction of a millimeter, the gap between the burrs becomes uneven. On one side of the grinder, the gap is wide; on the other, it is narrow.
The Boulder and Fine Problem
This misalignment creates a bimodal distribution nightmare. The wide side of the gap lets large chunks (boulders) pass through, while the narrow side pulverizes the coffee into dust (fines).
When you brew this mess, the water flows too fast past the boulders (underextraction) and gets clogged by the fines (overextraction). The result is a shot that tastes both sour and bitter simultaneously. This structural failure in the puck is a primary cause of channeling. If you are struggling with spurts and uneven flow, check out our guide on how to spot and fix uneven water flow.
The Geometry: Flat vs. Conical Burrs
While alignment is important for all grinders, this guide focuses primarily on flat burr grinders. Flat burrs rely heavily on parallelism to produce the unimodal grind distribution they are famous for. This geometry highlights flavor clarity and separation.
Conical burrs are more forgiving because of their shape and gravity-fed nature, but they can still suffer from alignment issues. However, shimming is predominantly a technique for flat burrs. To understand the fundamental differences in how these geometries cut coffee, read our comparison on flat vs. conical burrs and espresso flavor.
Tools You Will Need
Before you start pulling your grinder apart, gather these supplies. The process is delicate, so a clean workspace is essential.
- Dry Erase Marker: Use a color that contrasts with your burrs (red or green works best). Do not use a permanent marker.
- Screwdriver/Hex Keys: Check your grinder manual for the specific size required to remove the burr carrier and the burrs themselves.
- Aluminum Foil: Standard kitchen foil is perfect. It is usually about 0.01mm to 0.02mm thick, making it ideal for micro-adjustments.
- Scissors: For cutting tiny shims.
- Cleaning Tools: A brush and vacuum. You cannot align a dirty grinder.
Before proceeding, ensure your grinder is unplugged and fully cleaned. Old coffee oils and grounds will ruin your measurements. For a deep dive on maintenance, refer to our cleaning manifesto.
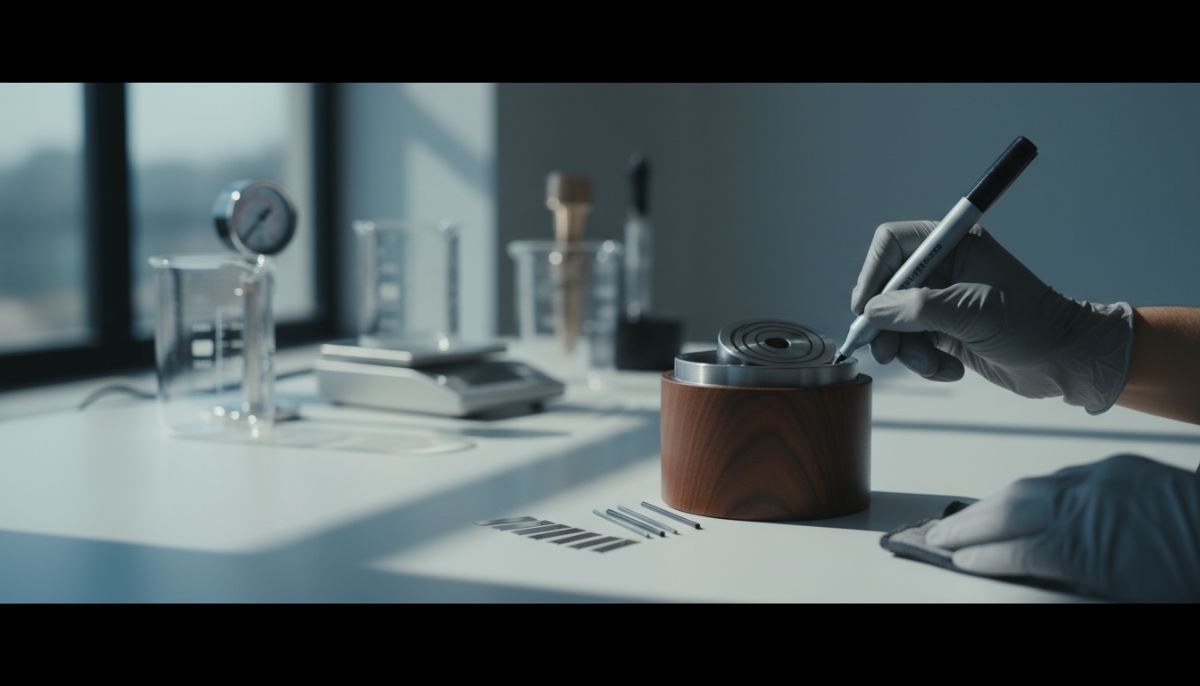
Step 1: The Marker Test
The marker test is the industry standard for diagnosing alignment issues. It reveals exactly where your burrs are touching and, more importantly, where they aren’t.
Painting the Burrs
Remove the top burr carrier and expose the brewing chamber. You need to identify which burr is the rotating burr (usually the bottom one connected to the motor) and which is the stationary burr (usually the top one). While you can shim both, we usually start by aligning the stationary burr.
Take your dry erase marker and color the entire flat outer edge of the cutting surface on both burrs. You don’t need to color the teeth deep inside, just the flat rim where the burrs would touch if they were fully closed.
The Contact Check
Reassemble the grinder. Screw the top carrier back on or lock it into place. Now, turn the grinder on. Slowly—very slowly—adjust the grind setting finer until you hear the distinct "chirp" of the burrs touching. This sound is the metal surfaces lightly grazing each other.
Stop immediately. Do not tighten it further, or you risk damaging the blades. Back the grinder off and turn it off.
Reading the Wipe Pattern
Disassemble the grinder again and inspect the marker ink.
- Perfect Alignment: The marker is wiped away cleanly and evenly around the entire circumference of the burr.
- Misalignment: The marker is wiped away only on one side (e.g., from 12 o’clock to 3 o’clock), but remains untouched on the rest.
If only a section of the ink is removed, that section is the "high spot." The side where the ink remains is the "low spot." Your goal is to raise the low spot to match the high spot.
Step 2: Creating and Placing Shims
Now that you have identified the low spots, it is time to shim. This process requires patience. You are dealing with tolerances thinner than a human hair.
Cutting the Foil
Cut small squares or rectangles of aluminum foil. They should be small enough to fit under the flat back of the burr without protruding into the screw holes or the grinding chamber. If foil sticks out, coffee grounds will get stuck under it, ruining your alignment later.
Installing the Shim
Remove the burr from its carrier. This is often the most intimidating part. Be careful not to strip the screws. Place your foil shim on the carrier surface corresponding to the "low spot" you identified in the marker test.
For example, if the marker was wiped away at the top (12 o’clock) but remained at the bottom (6 o’clock), the bottom is low. You need to place a shim at the 6 o’clock position to lift that side of the burr.
Place the burr back on top of the shim and tighten the screws. Tighten them in a star pattern (like changing a car tire) to ensure even pressure. Uneven tightening can warp the burr and skew your results.
Step 3: Verification and Iteration
Shimming is rarely a "one and done" process. You must verify your work.
Clean the burrs of any old marker ink and re-apply a fresh layer. Reassemble the grinder, run the motor, and find the chirp point again. Disassemble and inspect.
Did the wipe pattern improve? If the wipe pattern covers 70% of the burr now, you are making progress. You may need to add a second layer of foil to the same spot, or perhaps add a shim to a different area that is still not touching.
Repeat this process until you achieve a wipe pattern that covers at least 90% of the burr circumference. 100% is ideal, but 90% is often sufficient to notice a massive difference in cup quality.
Common Pitfalls to Avoid
Overtightening Screws
When reinstalling burrs, torque matters. If you crank one screw down significantly harder than the others, you can physically warp the burr or the carrier, creating artificial misalignment. Hand-tight is usually sufficient.
Ignoring Cleanliness
A single grain of coffee trapped between the burr and the carrier acts like a massive shim. Ensure the mounting surfaces are surgically clean before laying down your foil. We recommend purging your grinder before and after this process. For tips on this, read about why purging your grinder is non-negotiable.
The “Good Enough” Trap
It is tempting to stop after one try. However, true hyper-alignment pays dividends. If you typically use high-extraction baskets like VST or IMS, alignment is even more critical because these baskets offer less resistance. Read about how precision baskets interact with extraction to see why your grind consistency is vital.
The Results: What to Expect in the Cup
Once you have successfully shimmed your grinder, you will notice a few immediate changes. First, your zero point (the setting where burrs touch) will likely shift. You will need to re-dial in your beans.
In terms of flavor, the difference can be shocking. The astringency associated with channeling disappears. You will find that you can grind finer without choking the machine, allowing you to extract more sweetness and origin character. If you were previously confused by mixed flavor signals, checking our guide on troubleshooting sour vs. bitter espresso will be much easier with an aligned grinder.
Furthermore, your flow rate will become more visually appealing. Instead of erratic spurts, you will see a syrupy, steady stream that looks like warm honey.
Conclusion
Shimming your grinder is one of the highest ROI activities you can do for your home coffee setup. It costs almost nothing but time, yet it rivals the upgrade you would get from buying a significantly more expensive grinder.
By ensuring your burrs are parallel, you eliminate the random variables that ruin good coffee. It bridges the gap between frustration and consistency, putting you in full control of your extraction.
Frequently Asked Questions
The most common signs are inconsistent shot times, a mix of sour and bitter flavors in the same cup, and visible channeling. The definitive way to tell is by performing the marker test described in this article.
While possible, it is much more difficult and less common. Shimming is standard practice for flat burr grinders (like the DF64, Eureka Mignon, or Mahlkönig) because their geometry relies on parallelism.
Yes. The foil is placed underneath the burr, between the metal back of the burr and the carrier. It never comes into contact with the coffee beans.
It can. Misaligned burrs often create more fines (coffee dust), which are prone to static and clumping, leading to higher retention inside the grind chamber.