Is your expensive grinder producing inconsistent espresso? The culprit might be alignment. Master the marker test and learn how to shim your burrs for superior particle uniformity and flavor clarity.
Key Takeaways
- Precision Matters: Even premium grinders often ship with slight misalignments that cause uneven particle distribution.
- The Marker Test: A simple dry-erase marker is the most effective tool for diagnosing alignment issues on flat burrs.
- Shimming Fixes Flow: Placing small pieces of foil under the burr can correct angles, reducing channeling and increasing extraction yield.
- Flavor Impact: Proper alignment leads to higher clarity, sweetness, and a wider sweet spot for dialing in espresso.
You have invested in a high-end espresso machine. You have bought fresh beans. You have perfected your puck prep. Yet, your shots still taste muddy, or you struggle with unpredictable channeling. Before you blame your barista skills, look at your grinder.
Coffee grinding is a game of microns. If your burrs are not perfectly parallel, one side of the coffee bed will be coarse boulders while the other turns to dust. This is known as misalignment.
Burr alignment is often the missing link between good espresso and god-tier espresso. In this guide, we will walk you through the “marker test” and how to shim your grinder to achieve near-perfect parallelism.
What is Burr Alignment and Why Does It Matter?
In a flat burr grinder, two serrated discs sit facing each other. One rotates (the carrier), and one stays stationary. Ideally, these two discs should be perfectly parallel. When they are, the gap between them is uniform across the entire 360-degree circumference.
When burrs are misaligned, the gap varies. As the burr spins, it crushes beans into a wide mix of particle sizes. You end up with “fines” (dust) that clog your portafilter basket and “boulders” (large chunks) that water rushes past.
This inconsistency creates a major problem: Channeling. Water follows the path of least resistance, bypassing the boulders and over-extracting the fines. While you can try to mitigate this with better distribution tools, the root cause is mechanical. Misaligned burrs are a primary culprit behind channeling and uneven water flow.
The Flavor Cost of Misalignment
When you have a mix of over-extracted dust and under-extracted chunks, your espresso tastes confused. It might be bitter and sour simultaneously. Proper alignment narrows your particle distribution. This allows you to grind finer without choking the machine, leading to higher extraction yields, more sweetness, and distinct flavor separation.
This is true regardless of your equipment. Even top-tier setups, like those discussed in our comparison of high-end hand vs. electric grinders, can suffer from factory misalignment.
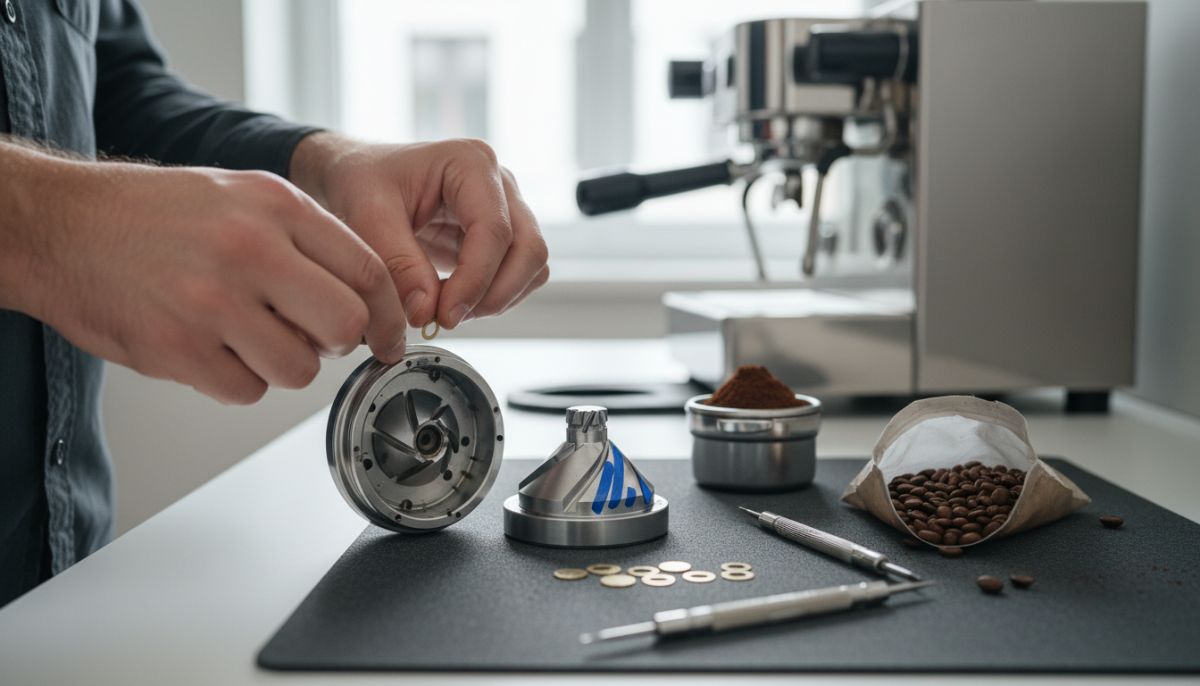
Tools You Will Need
You do not need a machine shop to align your burrs. You need patience and a few household items.
- A Screwdriver: To remove the burr carrier and burrs.
- Dry-Erase Marker: A whiteboard marker works best. Do not use a permanent Sharpie.
- Aluminum Foil: Standard kitchen foil is perfect for shimming.
- Scissors: To cut tiny foil shims.
- Cleaning Brush: To ensure surfaces are spotless.
Step 1: The Marker Test
The marker test is the industry standard for visualizing alignment. It reveals exactly where your burrs are touching and where they are not.
1. Clean Everything
Thoroughly clean your grinder. Remove all coffee grounds from the burrs and the carrier. Even a single grain of coffee trapped under a burr will throw off your results. This is a great time to reference our cleaning manifesto to ensure the rest of the chamber is spotless.
2. Mark the Burrs
Take your dry-erase marker and color the outer flat edge of both the top and bottom burrs. You only need to color the flat rim where the burrs make contact, not the teeth themselves. Ensure the ink is even.
3. Find the Touch Point
Reassemble the grinder. Turn the motor on. Slowly adjust the grind setting finer until you hear the distinct “chirp” of the burrs touching. Stop immediately.
Note: You only want a light touch. Grinding them together hard will dull your burrs.
4. Inspect the Wipe Pattern
Disassemble the grinder and look at the ink. Ideally, the marker should be wiped away cleanly and evenly around the entire circumference of both burrs.
- Full Wipe: Perfect alignment. No work needed.
- Partial Wipe: Misalignment. The area where the marker is wiped off is the “high point.” The area where the ink remains is the “low point.”
Step 2: Shimming the Burrs
If you have a partial wipe, you need to raise the low point to match the high point. This process is called shimming.
Identifying the Low Spot
Look at the burr where the ink remains. This side is sitting lower than the other side. To fix this, you will place a shim under the burr in that specific area to lift it up.
Creating the Shims
Cut a small piece of aluminum foil. It should be small enough to fit under the screw hole or the flat back of the burr without sticking out. Standard foil is usually about 0.01mm to 0.02mm thick, which is perfect for micro-adjustments.
Placing the Shim
- Remove the burr from its carrier.
- Place the foil shim on the carrier surface corresponding to the low spot (where the ink remained).
- Reinstall the burr on top of the shim.
- Tighten the screws. Ensure you tighten them evenly, similar to changing a tire, to prevent warping.
This process is vastly different depending on your equipment geometry. While we often discuss the nuances of flat vs. conical burrs, shimming is predominantly a technique for flat burrs. Conical burrs are self-centering and much harder to shim manually.
Step 3: Rinse and Repeat
Alignment is an iterative process. It is rare to get it right on the first try.
- Clean the burrs again to remove the old marker.
- Re-apply the marker to the edges.
- Reassemble, run the motor, and find the chirp point.
- Inspect the wipe pattern.
If the wipe is now larger but still incomplete, you may need a second layer of foil. If the wipe has moved to the opposite side, you over-shimmed and need to remove a layer or use a smaller piece.
Your goal is a wipe that covers at least 80% to 90% of the burr circumference. Chasing 100% can sometimes drive you mad, but get as close as you can.
Troubleshooting: When Shimming Doesn’t Work
Sometimes, the issue isn’t the burr seating, but the motor shaft or the carrier itself. If the wipe pattern wanders randomly every time you test, you might have a loose carrier or worn bearings. However, if your grinder consistently produces sour shots regardless of alignment, consider checking our guide on troubleshooting underextraction to ensure other variables aren’t at play.
The Result: What to Expect in the Cup
Once aligned, you will notice your grind setting needs to change. You will likely need to grind finer than before because you are no longer generating as many boulders. This is good.
You should experience:
- Faster Flow at Finer Settings: Because there are fewer fines clogging the basket.
- Consistency: Shot-to-shot variance will decrease.
- Flavor Clarity: The muddy notes disappear, replaced by specific tasting notes.
Keep in mind that while alignment is crucial, it works in tandem with other factors. For example, if you are using high-extraction baskets, alignment becomes even more critical. Check out our breakdown of stock vs. precision baskets to see how filtration affects your aligned grind.
Conclusion
Shimming your grinder is the single most cost-effective upgrade you can make to your coffee setup. It costs pennies in aluminum foil but can deliver flavor improvements comparable to buying a machine twice the price. It requires patience and a steady hand, but the reward is a level of precision that allows your coffee to truly shine.
Ready to take your espresso deeper? Once your grinder is aligned, you are ready to experiment with advanced techniques. Try exploring pressure profiling to see how your new, uniform grind reacts to different water pressures.
Frequently Asked Questions
Yes, alignment matters for all grinders, but shimming is primarily done on flat burrs. Conical burrs are generally self-centering, and manual alignment is difficult or impossible for most home users.
If done correctly, no. However, if you over-shim and force the burrs together, or if you overtighten the screws unevenly, you can warp the carrier or dull the burrs. Always proceed slowly.
Ideally, you only need to do this once, or whenever you remove the burrs for deep cleaning or replacement. If you drop the grinder or jam it, you may need to re-check.
Use a dry-erase whiteboard marker. It wipes off easily and won’t leave permanent residue on your grinding surfaces like a permanent marker would.
Not necessarily. Many commercial and high-end home grinders ship with slight manufacturing tolerances. Shimming is a standard procedure for enthusiasts wanting maximum performance, not necessarily a sign of a defective unit.