Learn how to froth oat, almond, and soy milk like a pro. A comprehensive guide on temperature limits, preventing curdling, and achieving latte art quality microfoam.
Key Takeaways
- Temperature Matters: Plant proteins coagulate at lower temperatures than dairy. Generally, stop steaming between 130°F–140°F (55°C–60°C) to prevent separation.
- Barista Blends are Essential: Standard supermarket cartons often lack the stabilizers (like gellan gum) and fat content required for microfoam.
- Watch the Acidity: High-acidity coffee beans can instantly curdle soy and almond milk. Adjust your espresso recipe or let the shot cool slightly.
- Technique Varies: Oat milk behaves similarly to dairy, while almond requires less aeration and gentler heat.
Transitioning from dairy to plant-based milk presents one of the steepest learning curves for home baristas. While a steam wand acts predictably with cow’s milk, non-dairy alternatives are chemically distinct. They lack casein and whey, relying instead on plant proteins (globulins) and added fats that react differently to heat and acidity.
To achieve café-quality microfoam without the dreaded “soap bubble” texture or curdling, you must adapt your technique to the specific chemical composition of the milk you are using.
The Science of Separation: Why Plant Milks Curdle
The most common pain point for home baristas is pouring perfectly steamed milk into an espresso shot, only to watch it split into curds and watery liquid. This is rarely a result of bad luck; it is chemistry.
Protein Coagulation and Acidity
Cow’s milk contains buffering agents that allow it to withstand the acidity of espresso (typically pH 4.5–5.0). Plant milks, particularly soy and almond, have lower buffering capacities. When hot plant milk hits acidic coffee, the proteins denature and clump together. This reaction is accelerated by heat. The hotter the milk, the faster the coagulation.
To mitigate this, you must control the two variables you have power over: the temperature of the milk and the acidity of the coffee. Using darker roasts with lower acidity or ensuring you do not overheat the milk is critical.
Choosing the Right Carton: Barista Series vs. Standard
If you are struggling to get texture with a standard carton of almond milk, the issue is likely the ingredients, not your skill. “Clean label” milks often lack the structural integrity needed for steaming.
- Standard Milks: Often have lower fat content and lack stabilizers. When steam is injected, the bubbles form but quickly collapse because there is no fat or gum network to hold them.
- Barista Series: These are formulated specifically for the steam wand. They typically contain acidity regulators (like dipotassium phosphate) to prevent curdling and stabilizers (like gellan gum or xanthan gum) to mimic the mouthfeel of dairy fats.
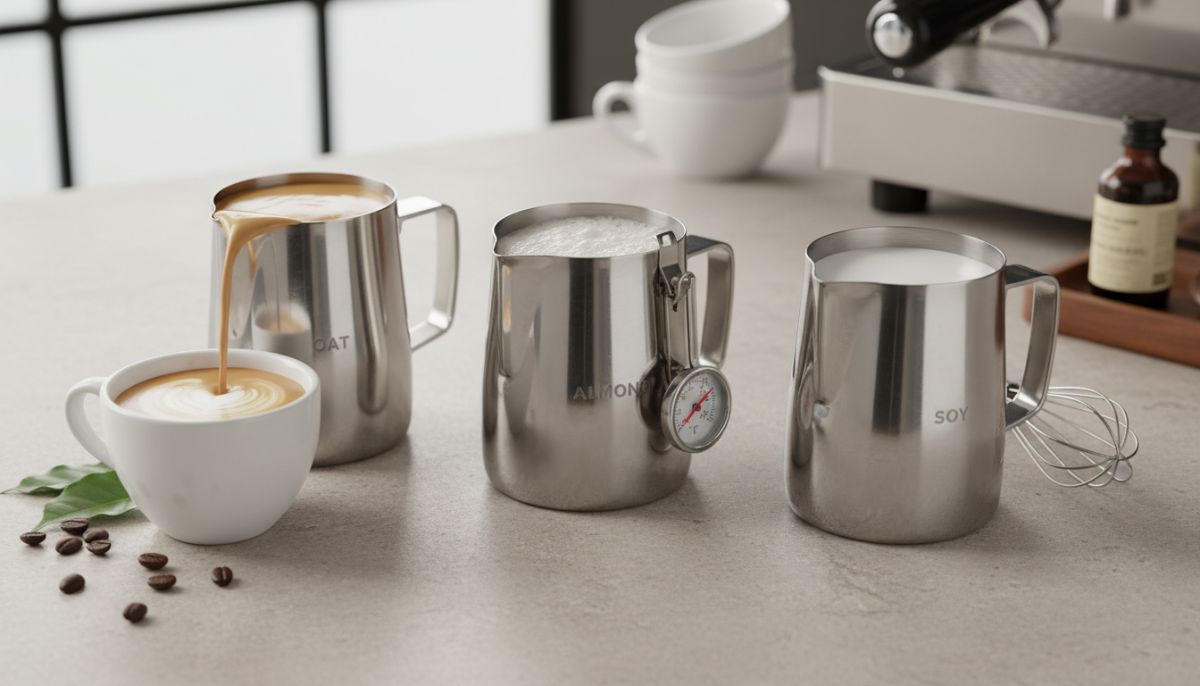
Deep Dive: Steaming Oat Milk
Oat milk is widely considered the gold standard for latte art alternatives because its behavior closely mimics dairy. It has a moderate protein structure and higher carbohydrate content (sugar), allowing for excellent caramelization.
Technique & Temperature
Treat oat milk almost exactly like whole cow’s milk, but be mindful of the heat. While dairy can withstand 150°F (65°C), oat milk can develop a “porridge-like” texture if pushed too far.
- Aeration (Stretching): Stretch for the first 3–5 seconds until the pitcher feels warm to the touch. Listen for the “tearing paper” sound.
- Texturing (The Vortex): Submerge the wand slightly to create a whirlpool. This integrates the bubbles into a silky microfoam.
- Target Temperature: Stop at 140°F (60°C).
For a foundational understanding of foam structure, review our guide on wet vs. dry microfoam, which applies heavily to getting that glossy paint-like texture with oat milk.
Deep Dive: Steaming Almond Milk
Almond milk is notoriously difficult. It is low in protein and high in water, making it prone to quick separation and thin, watery foam.
The “Low and Slow” Approach
Almond milk burns easily. If you overheat it, it will develop a burnt, bitter taste and split immediately upon contact with coffee.
- Aeration: Keep aeration minimal. Introduce air very gently for the first 2–3 seconds. Too much air creates large, dry bubbles that refuse to incorporate.
- Texturing: Spend the majority of your time spinning the milk. You need a strong vortex to smash the bubbles into the thin liquid.
- Target Temperature: Stop early, around 130°F (55°C). Do not rely on hand-feel alone if you are inexperienced; a thermometer is highly recommended here.
Troubleshooting the Split: If your almond milk splits, check your coffee beans. Lighter roasts are more acidic. You may need to adjust your recipe or switch to a bean with lower acidity, similar to how you might adjust parameters when dialing in washed vs. natural process beans.
Deep Dive: Steaming Soy Milk
Soy milk has the highest protein content of the three, creating a thick, creamy foam that is excellent for cappuccino drinkers. However, it is the most sensitive to thermal shock.
The Curdling Challenge
Soy proteins coagulate aggressively in acidic environments. If you pour boiling hot soy milk into a bright, acidic espresso, you will get “tofu” in your cup.
- Aeration: You can stretch soy milk slightly longer than almond milk, similar to oat.
- Texturing: Ensure a consistent roll to polish the surface.
- Target Temperature: Maximum 140°F (60°C).
- Pouring Tip: Pour quickly and confidently. The longer the milk sits in the pitcher, the more the foam separates from the liquid. Tempering the espresso (adding a splash of milk and stirring before pouring the rest) can also help prevent shock-curdling.
Home Machines vs. Commercial Setups
Commercial machines use large boilers with high steam pressure (1.5–2.0 bar), creating a violent vortex instantly. Home machines, especially entry-level models, often have lower steam pressure.
If you are using a compact machine (see our review of entry-level espresso machines), you must compensate for the lack of power:
- Wand Position: You must be more precise. Place the tip just off-center to encourage rotation. If the milk isn’t spinning, you aren’t texturing; you are just boiling the liquid.
- Time: It will take longer to heat the milk. Do not rush the aeration phase. Ensure you have introduced enough air before the milk gets too hot to stretch.
- Stability: On single-boiler machines, purge the wand thoroughly to remove water before steaming. Temperature stability is key, a concept explained further in our guide on PID controllers.
Troubleshooting Common Issues
1. The Screeching Sound
If the steam wand screams at you, you are not introducing air. The tip is too deep. Lower the pitcher slightly until you hear gentle tearing sounds. This is vital for all plant milks, but especially almond milk, which needs gentle handling.
2. Large, Soapy Bubbles
This usually happens when you stretch the milk too late in the process. Once the milk exceeds 100°F (37°C), the proteins set and can no longer accept new air bubbles gracefully. All aeration must happen before the pitcher feels warm.
3. Foam Collapsing Quickly
This is a symptom of insufficient stabilizers or overheating. If you are using a “clean” almond milk (water and almonds only), the foam will naturally collapse because there is no fat network to support it. Switch to a Barista Blend or stop steaming 5–10 degrees cooler.
Summary: The Plant Milk Heat Index
- Oat: 140°F–150°F (60°C–65°C) – Most stable.
- Soy: 130°F–140°F (55°C–60°C) – Prone to thermal shock.
- Almond: 120°F–130°F (50°C–55°C) – Least stable, burns easily.
Mastering these milks requires patience. By understanding the chemical limitations of plant proteins and adjusting your variables—temperature, agitation, and coffee acidity—you can pour latte art that rivals any dairy-based beverage. For consistent results, ensure your underlying espresso extraction is solid; checking your ratios and yield is a good place to start.
Frequently Asked Questions
Almond milk separates (curdles) due to the acidity of the coffee and heat shock. Almond proteins are sensitive to acids found in coffee (pH 4.5–5). To prevent this, use a lower steaming temperature (max 130°F/55°C), use low-acidity espresso beans, or warm the milk gently rather than scalding it.
The ideal temperature for oat milk is between 140°F and 150°F (60°C–65°C). This range allows the natural sugars to caramelize without breaking down the texture. Exceeding 150°F often results in a mushy, porridge-like flavor.
Yes, it is highly recommended. Barista editions contain stabilizers like gellan gum and acidity regulators (dipotassium phosphate) that allow the milk to stretch and hold microfoam. Standard supermarket cartons usually lack these ingredients, resulting in watery foam that collapses quickly.
Avoid overheating the milk; stop steaming around 140°F (60°C). Additionally, try ‘tempering’ your espresso by adding a small splash of steamed milk and stirring it into the coffee before pouring the rest. This gradually adjusts the temperature and pH, reducing shock.
Home machines often have lower steam pressure than commercial ones. To compensate, position the steam wand tip just off-center to maximize the ‘vortex’ spin. Steam small amounts of milk at a time and focus on introducing air (stretching) immediately before the milk gets warm.